


The countdown to Halloween has officially begun, and fall at my house is in full swing. I am starting out by changing all the coffee, cereal, ice cream, and bagels to pumpkin spice flavored. My family will just have to deal with it. JUST GIVE MOMMA THE PUMPKIN SPICE.
I love DIY Halloween décor, but I aim to find a balance between cute and creepy. With my kids all being under the age of five, I lean toward cute. My four-year-old is ALWAYS asking a million questions, and I’m just not prepared nor ready to explain bones, skulls, and—well—blood. I try to stick with spiders and pumpkins. Occasionally I will throw in a cutesy witch or ghost, but those are still difficult to explain. Usually, I just end up telling them “go ask daddy,” to see what imaginative answer he comes up with.
I am so excited to share with you four craft ideas that are totally cute and not creepy. Two of my crafts can also stay out until Thanksgiving. How awesome is that? The best part? These crafts are all budget friendly and most of the materials were purchased at the dollar store. I like dollar store décor because if it breaks—or even gets eaten by my goat of a child. It’s OK because there is very little invested in it. Some of these projects take a little time to make. Hopefully, you can get your little ones involved and make a fun afternoon of it!
Two fall crafts I have come up with for you:
Fall Pumpkin Topiary
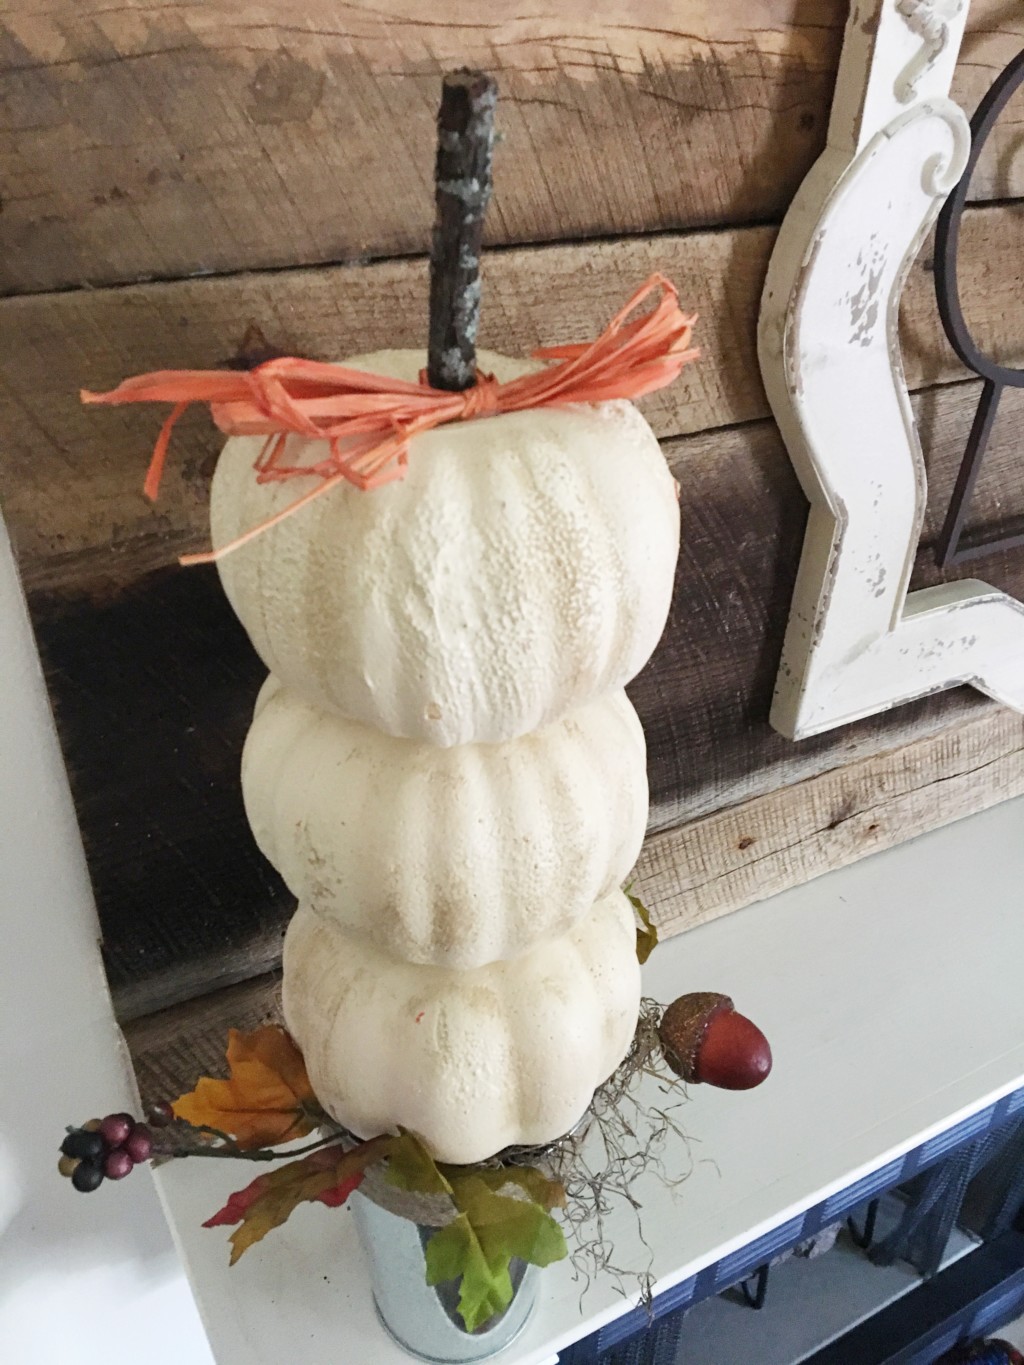
Materials:
3 Carvable Pumpkins (Dollar Tree)
1 Stick (Shhhh My Neighbor’s yard)
Package of Raffia Ribbon (comes in pack of three from Dollar Tree)
1 Fall Silk Floral Stem (Dollar Tree)
Package of Moss (Dollar Tree)
1 Metal Container (Dollar Tree)
Cream Spray Paint
Brown Acrylic Paint
Wooden Skewer
Hot Glue
Floral Foam (Dollar Tree)
Directions:
- Start by taking the original stems off the pumpkins and spray paint the pumpkins.
- Glue the floral foam in the metal container and cover to the top with moss.
- Put cut the floral steams to your preference and place them in the foam.
- Hot glue the bottom of the first pumpkin to the moss.
- Glue the second pumpkin to the first pumpkin.
- Place skewer in the first two pumpkins ensuring it goes into the floral foam leaving about an inch sticking out from the top.
- Hot glue the final pumpkin and insert it through the skewer.
- Place your stick in the top pumpkin for the new stem, secure with hot glue.
- Tie raffia ribbon around the stem.
- Take a dry paint brush and “antique” the pumpkins for some definition. If needed, use a damp paper towel to blend it in.
Cost $15
Pumpkin Perfect

Materials:
5×7 Picture Frame (Dollar Tree)
Spray Paint (used the same paint from pumpkins above)
Fall Scrapbook Paper (Hobby Lobby)
Light up Glitter Jack o’ Lantern (Dollar Tree)
Raffia (used the same raffia from pumpkins above)
Hot Glue
Directions:
- Spray paint frame and let dry.
- Hot glue paper to frame backing.
- Remove the stem from pumpkin and set aside.
- Cut jack o’ lantern in half, I just used scissors.
- Cut a new half circle in the pumpkin for the stem to go in.
- Hot glue the stem in.
- Tie ribbon around stem.
- Glue around the edge of the pumpkin and press against the backing of the frame.
Cost $3
Now for our cute not creepy Halloween decorations:
Creepy Crawler Door Spiders
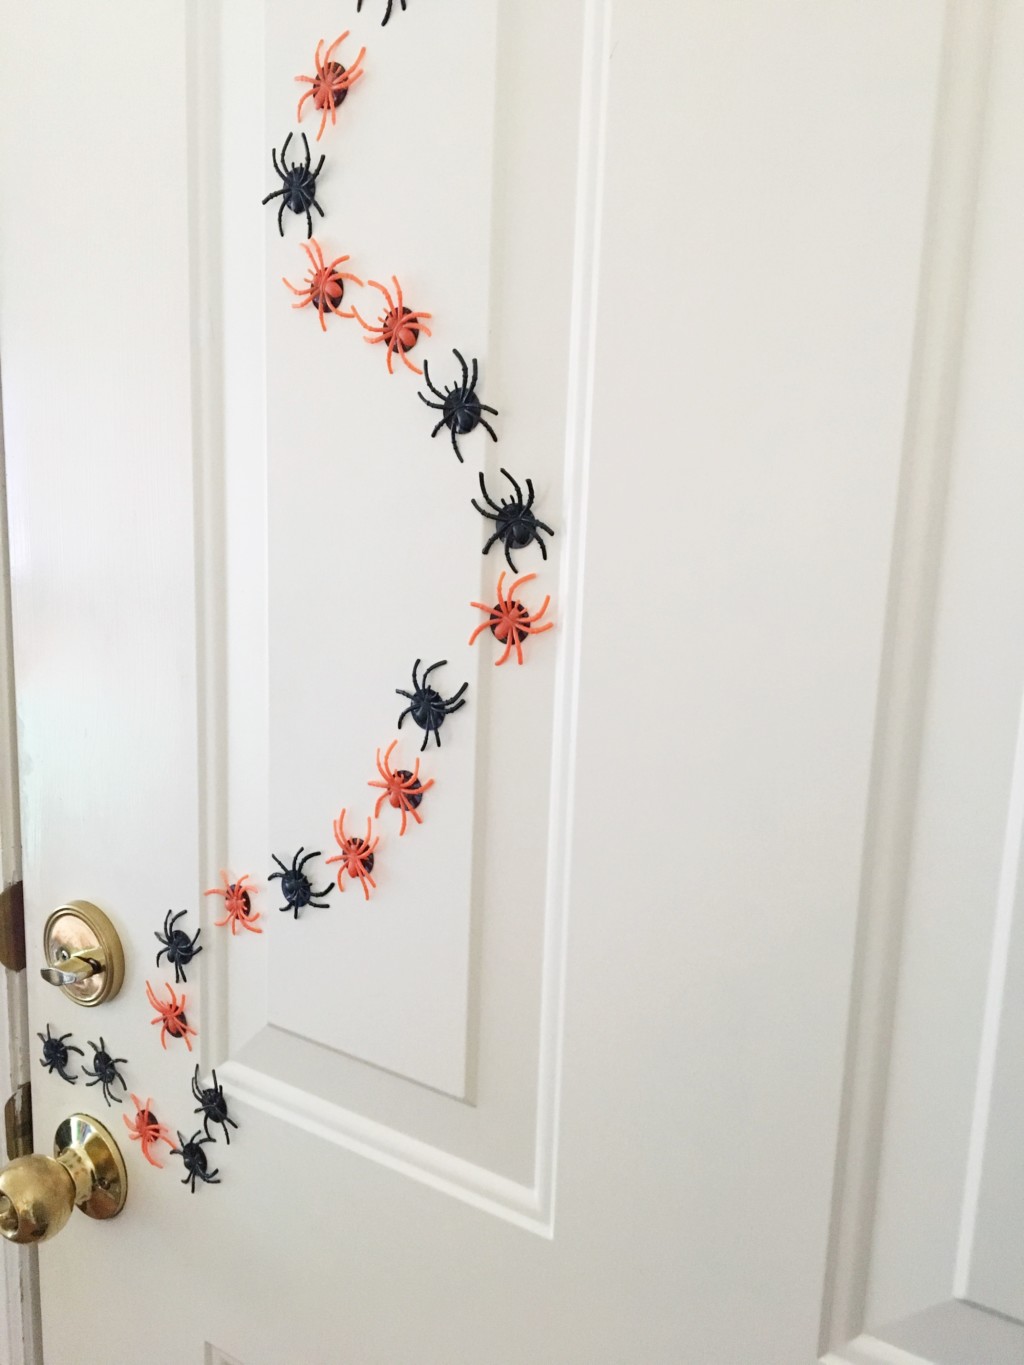
Materials:
Sticky Magnets (Hobby Lobby)
Spider Rings (Dollar Tree)
Hot Glue
Directions:
- Cut the ring part off the spiders.
- Hot glue spiders to magnets.
Cost $4
Spider Web Wreath

Materials:
Black Yarn (.99 at Hobby Lobby)
White Yarn (.99 at Hobby Lobby)
Black and White Twine (Hobby Lobby)
Foam Wreath (Dollar Tree)
Large Glitter Spider (Dollar Tree)
Hot Glue
Directions:
- Mark off 8 even sections on the wreath.
- Wrap every other section with white yarn, glue each end.
- Wrap every other section with black yarn, glue each end.
- Make a spider web with the twine using hot glue to secure each section. If you didn’t want to purchase the extra twine you could also use the yarn.
- Hot glue the spider on the wreath.
Cost $6
I hope these little crafts will bring fall alive in your home. Have a safe Halloween!


